Background
A while ago, I have built an web-based self-service portal that facilitated multiple teams in the organisation, setting up their Access Control (ACLs) for corresponding data lake folders.
The portal application was targeting Azure Data Lake Gen 1. Recently I wanted to achieve the same but on Azure Data Lake Gen 2. At the time of writing this post, there’s no official NuGet package for ACL management targeting Data Lake Gen 2. One must rely on REST API only.
Read about known issues and limitations of Azure Data Lake Storage Gen 2
Further more, the REST API documentations do not provide example snippets like many other Azure resources. Therefore, it takes time to demystify the REST APIs to manipulate ACLs. Good new is, I have done that for you and will share a straight-forward C# class that wraps the details and issues correct REST API calls to a Data Lake Store Gen 2.
About Azure Data Lake Store Gen 2
Azure Data Lake Storage Gen2 is a set of capabilities dedicated to big data analytics. Data Lake Storage Gen2 is significantly different from it’s earlier version known as Azure Data Lake Storage Gen1, Gen2 is entirely built on Azure Blob storage.
Data Lake Storage Gen2 is the result of converging the capabilities of two existing Azure storage services, Azure Blob storage and Azure Data Lake Storage Gen1. Gen1 Features such as file system semantics, directory, and file level security and scale are combined with low-cost, tiered storage, high availability/disaster recovery capabilities from Azure Blob storage.
Let’s get started!
Create a Service Principal
First we would need a service principal. We will use this principal to authenticate to Azure Active Directory (using OAuth 2.0 protocol) in order to authorize our REST calls. We will use Azure CLI to do that.
az ad sp create-for-rbac --name ServicePrincipalName
Add required permissions
Now you need to grant permission for your application to access Azure Storage.
- Click on the application Settings
- Click on Required permissions
- Click on Add
- Click Select API
- Filter on Azure Storage
- Click on Azure Storage
- Click Select
- Click the checkbox next to Access Azure Storage
- Click Select
- Click Done
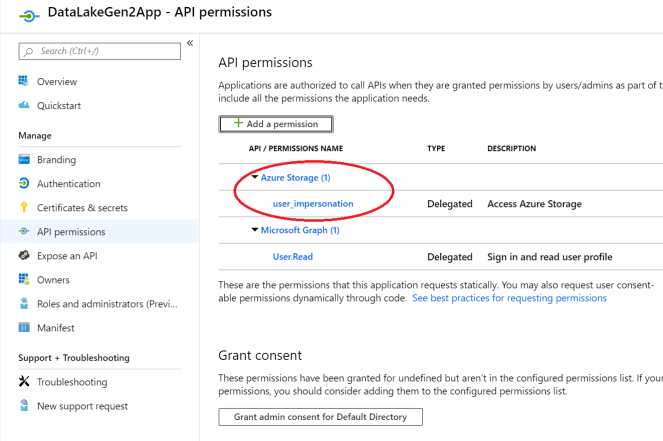
Now we have Client ID, Client Secret and Tenant ID (take it from the Properties tab of Azure Active Directory – listed as Directory ID).
Access Token from Azure Active Directory
Let’s write some C# code to get an Access Token from Azure Active Directory:
This file contains hidden or bidirectional Unicode text that may be interpreted or compiled differently than what appears below. To review, open the file in an editor that reveals hidden Unicode characters.
Learn more about bidirectional Unicode characters
| public class TokenProvider | |
| { | |
| private readonly string tenantId; | |
| private readonly string clientId; | |
| private readonly string secret; | |
| private readonly string scopeUri; | |
| private const string IdentityEndpoint = "https://login.microsoftonline.com"; | |
| private const string DEFAULT_SCOPE = "https://management.azure.com/"; | |
| private const string MEDIATYPE = "application/x-www-form-urlencoded"; | |
| public OAuthTokenProvider(string tenantId, string clientId, string secret, string scopeUri = DEFAULT_SCOPE) | |
| { | |
| this.tenantId = tenantId; | |
| this.clientId = WebUtility.UrlEncode(clientId); | |
| this.secret = WebUtility.UrlEncode(secret); | |
| this.scopeUri = WebUtility.UrlEncode(scopeUri); | |
| } | |
| public async Task<Token> GetAccessTokenV2EndpointAsync() | |
| { | |
| var url = $"{IdentityEndpoint}/{this.tenantId}/oauth2/v2.0/token"; | |
| var Http = Statics.Http; | |
| Http.DefaultRequestHeaders.Accept.Clear(); | |
| Http.DefaultRequestHeaders.Accept.Add(new MediaTypeWithQualityHeaderValue(MEDIATYPE)); | |
| var body = $"grant_type=client_credentials&client_id={clientId}&client_secret={secret}&scope={scopeUri}"; | |
| var response = await Http.PostAsync(url, new StringContent(body, Encoding.UTF8, MEDIATYPE)); | |
| if (response.IsSuccessStatusCode) | |
| { | |
| var tokenResponse = await response.Content.ReadAsStringAsync(); | |
| return JsonConvert.DeserializeObject<Token>(tokenResponse); | |
| } | |
| return default(Token); | |
| } | |
| public class Token | |
| { | |
| public string access_token { get; set; } | |
| public string token_type { get; set; } | |
| public int expires_in { get; set; } | |
| public int ext_expires_in { get; set; } | |
| } | |
| } |
Creating ADLS Gen 2 REST client
Once we have the token provider, we can jump in implementing the REST client for Azure Data Lake.
This file contains hidden or bidirectional Unicode text that may be interpreted or compiled differently than what appears below. To review, open the file in an editor that reveals hidden Unicode characters.
Learn more about bidirectional Unicode characters
| public class FileSystemApi | |
| { | |
| private readonly string storageAccountName; | |
| private readonly OAuthTokenProvider tokenProvider; | |
| private readonly Uri baseUri; | |
| private const string ACK_HEADER_NAME = "x-ms-acl"; | |
| private const string API_VERSION_HEADER_NAME = "x-ms-version"; | |
| private const string API_VERSION_HEADER_VALUE = "2018-11-09"; | |
| private int Timeout = 100; | |
| public FileSystemApi(string storageAccountName, OAuthTokenProvider tokenProvider) | |
| { | |
| this.storageAccountName = storageAccountName; | |
| this.tokenProvider = tokenProvider; | |
| this.baseUri = new Uri($"https://{this.storageAccountName}.dfs.core.windows.net"); | |
| } |
Data Lake ACLs and POSIX permissions
The security model for Data Lake Gen2 supports ACL and POSIX permissions along with some extra granularity specific to Data Lake Storage Gen2. Settings may be configured through Storage Explorer or through frameworks like Hive and Spark. We will do that via REST API in this post.
There are two kinds of access control lists (ACLs), Access ACLs and Default ACLs.
- Access ACLs: These control access to an object. Files and folders both have Access ACLs.
- Default ACLs: A “template” of ACLs associated with a folder that determine the Access ACLs for any child items that are created under that folder. Files do not have Default ACLs.
Here’s the table of allowed grant types:
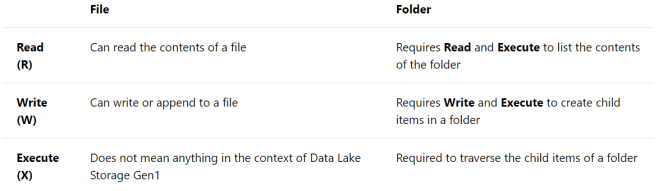
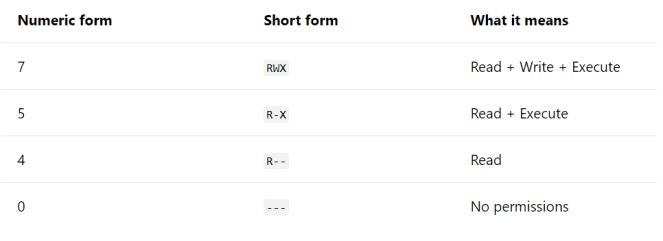
While we define ACLs we need to use a short form of these grant types. Microsoft Document explained these short form in below table:
However, in our code we would also simplify the POSIX ACL notations by using some supporting classes as below. That way REST client consumers do not need to spend time building the short form of their aimed grant criteria’s.
This file contains hidden or bidirectional Unicode text that may be interpreted or compiled differently than what appears below. To review, open the file in an editor that reveals hidden Unicode characters.
Learn more about bidirectional Unicode characters
| public enum AclType | |
| { | |
| User, | |
| Group, | |
| Other, | |
| Mask | |
| } | |
| public enum AclScope | |
| { | |
| Access, | |
| Default | |
| } | |
| [FlagsAttribute] | |
| public enum GrantType : short | |
| { | |
| None = 0, | |
| Read = 1, | |
| Write = 2, | |
| Execute = 4 | |
| }; | |
| public class AclEntry | |
| { | |
| public AclEntry(AclScope scope, AclType type, string upnOrObjectId, GrantType grant) | |
| { | |
| Scope = scope; | |
| AclType = type; | |
| UpnOrObjectId = upnOrObjectId; | |
| Grant = grant; | |
| } | |
| public AclScope Scope { get; private set; } | |
| public AclType AclType { get; private set; } | |
| public string UpnOrObjectId { get; private set; } | |
| public GrantType Grant { get; private set; } | |
| public string GetGrantPosixFormat() | |
| { | |
| return $"{(this.Grant.HasFlag(GrantType.Read) ? 'r' : '-')}{(this.Grant.HasFlag(GrantType.Write) ? 'w' : '-')}{(this.Grant.HasFlag(GrantType.Execute) ? 'x' : '-')}"; | |
| } | |
| public override string ToString() | |
| { | |
| return $"{(this.Scope == AclScope.Default ? "default:" : string.Empty)}{this.AclType.ToString().ToLowerInvariant()}:{this.UpnOrObjectId}:{GetGrantPosixFormat()}"; | |
| } | |
| } |
Now we can create methods to perform different REST calls, let’s start by creating a file system.
This file contains hidden or bidirectional Unicode text that may be interpreted or compiled differently than what appears below. To review, open the file in an editor that reveals hidden Unicode characters.
Learn more about bidirectional Unicode characters
| public async Task<bool> CreateFileSystemAsync( | |
| string fileSystemName) | |
| { | |
| var tokenInfo = await tokenProvider.GetAccessTokenV2EndpointAsync(); | |
| var jsonContent = new StringContent(string.Empty); | |
| var headers = Statics.Http.DefaultRequestHeaders; | |
| headers.Clear(); | |
| headers.Add("Authorization", $"Bearer {tokenInfo.access_token}"); | |
| headers.Add(API_VERSION_HEADER_NAME, API_VERSION_HEADER_VALUE); | |
| var response = await Statics.Http.PutAsync($"{baseUri}{WebUtility.UrlEncode(fileSystemName)}?resource=filesystem", jsonContent); | |
| return response.IsSuccessStatusCode; | |
| } |
Here we are retrieving a Access Token and then issuing a REST call to Azure Data Lake Storage Gen 2 API to create a new file system. Next, we will create a folder and file in it and then set some Access Control to them.
Let’s create the folder:
This file contains hidden or bidirectional Unicode text that may be interpreted or compiled differently than what appears below. To review, open the file in an editor that reveals hidden Unicode characters.
Learn more about bidirectional Unicode characters
| public async Task<bool> CreateDirectoryAsync(string fileSystemName, string fullPath) | |
| { | |
| var tokenInfo = await tokenProvider.GetAccessTokenV2EndpointAsync(); | |
| var jsonContent = new StringContent(string.Empty); | |
| var headers = Statics.Http.DefaultRequestHeaders; | |
| headers.Clear(); | |
| headers.Add("Authorization", $"Bearer {tokenInfo.access_token}"); | |
| headers.Add(API_VERSION_HEADER_NAME, API_VERSION_HEADER_VALUE); | |
| var response = await Statics.Http.PutAsync($"{baseUri}{WebUtility.UrlEncode(fileSystemName)}{fullPath}?resource=directory", jsonContent); | |
| return response.IsSuccessStatusCode; | |
| } |
And creating file in it. Now, file creation (ingestion in Data Lake) is not that straight forward, at least, one can’t do that by a single call. We would have to first create an empty file, then we can write some content in it. We can also append content to an existing file. Finally, we would require to flush the buffer so the new content gets persisted.
Let’s do that, first we will see how to create an empty file:
This file contains hidden or bidirectional Unicode text that may be interpreted or compiled differently than what appears below. To review, open the file in an editor that reveals hidden Unicode characters.
Learn more about bidirectional Unicode characters
| public async Task<bool> CreateEmptyFileAsync(string fileSystemName, string path, string fileName) | |
| { | |
| var tokenInfo = await tokenProvider.GetAccessTokenV2EndpointAsync(); | |
| var jsonContent = new StringContent(string.Empty); | |
| var headers = Statics.Http.DefaultRequestHeaders; | |
| headers.Clear(); | |
| headers.Add("Authorization", $"Bearer {tokenInfo.access_token}"); | |
| headers.Add(API_VERSION_HEADER_NAME, API_VERSION_HEADER_VALUE); | |
| var response = await Statics.Http.PutAsync($"{baseUri}{WebUtility.UrlEncode(fileSystemName)}{path}{fileName}?resource=file", jsonContent); | |
| return response.IsSuccessStatusCode; | |
| } |
The above snippet will create an empty file, now we will read all content from a local file (from PC) and write them into the empty file in Azure Data Lake that we just created.
This file contains hidden or bidirectional Unicode text that may be interpreted or compiled differently than what appears below. To review, open the file in an editor that reveals hidden Unicode characters.
Learn more about bidirectional Unicode characters
| public async Task<bool> CreateFileAsync(string filesystem, string path, | |
| string fileName, Stream stream) | |
| { | |
| var operationResult = await this.CreateEmptyFileAsync(filesystem, path, fileName); | |
| if (operationResult) | |
| { | |
| var tokenInfo = await tokenProvider.GetAccessTokenV2EndpointAsync(); | |
| var headers = Statics.Http.DefaultRequestHeaders; | |
| headers.Clear(); | |
| headers.Add("Authorization", $"Bearer {tokenInfo.access_token}"); | |
| headers.Add(API_VERSION_HEADER_NAME, API_VERSION_HEADER_VALUE); | |
| using (var streamContent = new StreamContent(stream)) | |
| { | |
| var resourceUrl = $"{baseUri}{filesystem}{path}{fileName}?action=append&timeout={this.Timeout}&position=0"; | |
| var msg = new HttpRequestMessage(new HttpMethod("PATCH"), resourceUrl); | |
| msg.Content = streamContent; | |
| var response = await Statics.Http.SendAsync(msg); | |
| //flush the buffer to commit the file | |
| var flushUrl = $"{baseUri}{filesystem}{path}{fileName}?action=flush&timeout={this.Timeout}&position={msg.Content.Headers.ContentLength}"; | |
| var flushMsg = new HttpRequestMessage(new HttpMethod("PATCH"), flushUrl); | |
| response = await Statics.Http.SendAsync(flushMsg); | |
| return response.IsSuccessStatusCode; | |
| } | |
| } | |
| return false; | |
| } |
Right! Now time to set Access control to the directory or files inside a directory. Here’s the method that we will use to do that.
This file contains hidden or bidirectional Unicode text that may be interpreted or compiled differently than what appears below. To review, open the file in an editor that reveals hidden Unicode characters.
Learn more about bidirectional Unicode characters
| public async Task<bool> SetAccessControlAsync(string fileSystemName, string path, AclEntry[] acls) | |
| { | |
| var targetPath = $"{WebUtility.UrlEncode(fileSystemName)}{path}"; | |
| var tokenInfo = await tokenProvider.GetAccessTokenV2EndpointAsync(); | |
| var jsonContent = new StringContent(string.Empty); | |
| var headers = Statics.Http.DefaultRequestHeaders; | |
| headers.Clear(); | |
| headers.Add("Authorization", $"Bearer {tokenInfo.access_token}"); | |
| headers.Add(API_VERSION_HEADER_NAME, API_VERSION_HEADER_VALUE); | |
| headers.Add(ACK_HEADER_NAME, string.Join(',', acls.Select(a => a.ToString()).ToArray())); | |
| var response = await Statics.Http.PatchAsync($"{baseUri}{targetPath}?action=setAccessControl", jsonContent); | |
| return response.IsSuccessStatusCode; | |
| } |
The entire File system REST API class can be found here. Here’s an example how we can use this methods from a console application.
This file contains hidden or bidirectional Unicode text that may be interpreted or compiled differently than what appears below. To review, open the file in an editor that reveals hidden Unicode characters.
Learn more about bidirectional Unicode characters
| var tokenProvider = new OAuthTokenProvider(tenantId, clientId, secret, scope); | |
| var hdfs = new FileSystemApi(storageAccountName, tokenProvider); | |
| var response = hdfs.CreateFileSystemAsync(fileSystemName).Result; | |
| hdfs.CreateDirectoryAsync(fileSystemName, "/demo").Wait(); | |
| hdfs.CreateEmptyFileAsync(fileSystemName, "/demo/", "example.txt").Wait(); | |
| var stream = new FileStream(@"C:\temp.txt", FileMode.Open, FileAccess.Read); | |
| hdfs.CreateFileAsync(fileSystemName, "/demo/", "mytest.txt", stream).Wait(); | |
| var acls = new AclEntry[] | |
| { | |
| new AclEntry( | |
| AclScope.Access, | |
| AclType.Group, | |
| "2dec2374-3c51-4743-b247-ad6f80ce4f0b", | |
| (GrantType.Read | GrantType.Execute)), | |
| new AclEntry( | |
| AclScope.Access, | |
| AclType.Group, | |
| "62049695-0418-428e-a5e4-64600d6d68d8", | |
| (GrantType.Read | GrantType.Write | GrantType.Execute)), | |
| new AclEntry( | |
| AclScope.Default, | |
| AclType.Group, | |
| "62049695-0418-428e-a5e4-64600d6d68d8", | |
| (GrantType.Read | GrantType.Write | GrantType.Execute)) | |
| }; | |
| hdfs.SetAccessControlAsync(fileSystemName, "/", acls).Wait(); |
Conclusion
Until, there’s an Official Client Package released, if you’re into Azure Data Lake Store Gen 2 and wondering how to accomplish these REST calls – I hope this post helped you to move further!
Thanks for reading.

Hey Moïm!
Thanks for sharing this. I had a hard time figuring out how to automate ACL setting in ADLS then I found your blog!
Keep it up and thanks again for sharing great content!
LikeLiked by 1 person