Azure Active Directory B2C (Azure AD B2C) provides support for the SAML 2.0 identity provider. With this capability, you can create a technical profile in Azure AD B2C to federate with SAML-based identity provider, such as ADFS. Thus, allow users to sign in with their existing enterprise identities. Microsoft has good docs on this topic, however, there are few steps that are currently not adequately documented and might lead to errors, unless you’re an identity pro.
In this blog post, I will write down the steps you need to take to setup ADFS federation with Azure AD B2C and the steps that you should watch out.
Setting up ADFS in Azure VM
We would need an ADFS server for this exercise, and we will spin up a virtual machine in Azure with ADFS installed. This article explains the steps you need to standup a virtual machine with ADFS in it. However, this article would use a self-signed certificate in ADFS configuration and Azure AD B2C won’t appreciate that. Azure AD B2C will only accept certificates from well known certificate authorities (CA).
Creating certificate
We will use a free certificate from Let’s Encrypt. I have used win-acme for that. Download win-acme from the site and lunch it in a windows machine. Crucial step is when you provide the Domain name for the certificate, you need to make sure, you have provided the DNS name of your virtual machine here.

One problem though, you won’t be able to export the certificate with private key – which is required by ADFS. You need additional steps to export certificate with private keys and here’s an article that shows how to do that. With the certificate (with private keys) you can complete the ADFS setup as described in this article.
Once created, you might want to check the federation setup with a simple ASP.net MVC app – just to make sure, users defined in ADDS are able to Sign-in with your ADFS. I have a simple application in GitHub that allows you to do that. Just change the web.config file with the domain name of your ADFS.
<appSettings>
	<add key="ida:ADFSMetadata" value="https://woodbine.westeurope.cloudapp.azure.com/FederationMetadata/2007-06/FederationMetadata.xml" />
	<add key="ida:Wtrealm" value="https://localhost:44380/" />
</appSettings>
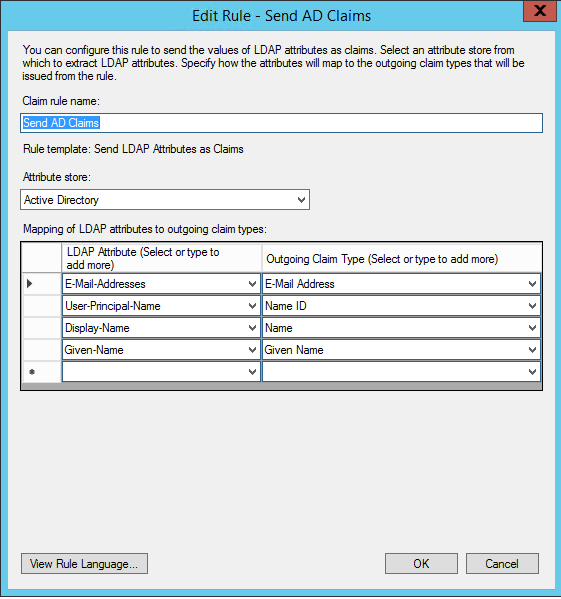
You would also need to create a relying party trust in ADFS for this app. Make sure you have the following LDAP attributes mapped as outgoing claims in Claim Rules for your relying party trust configuration.
Creating Azure AD B2C Tenant
Create a tenant for Azure AD B2C from Azure Portal as described in here.
Creating certificate
You would need one more certificate that Azure AD B2C would use to sign the SAML requests sent to ADFS (SAML identity provider). For production scenarios, you should use a proper CA certificate, but for non-production scenarios, a self-signed certificate will suffice. You can generate one in PowerShell like below:
$tenantName = "<YOUR TENANT NAME>.onmicrosoft.com"
$pwdText = "<YOUR PASSWORD HERE>"

$Cert = New-SelfSignedCertificate -CertStoreLocation Cert:\CurrentUser\My -DnsName "$tenantName" -Subject "B2C SAML Signing Cert" -HashAlgorithm SHA256 -KeySpec Signature -KeyLength 2048
$pwd = ConvertTo-SecureString -String $pwdText -Force -AsPlainText
Export-PfxCertificate -Cert $Cert -FilePath .\B2CSigningCert.pfx -Password $pwd
Next, you need to upload the certificate in Azure AD B2C. In Azure portal go to Azure AD B2C, then Identity Experience Framework tab from the left, then Policy Keys (also from the left menu) and add a new policy key. Choose upload options and provide the PFX file generated earlier. Provide the name of the policy key ‘ADFSSamlCert’ (Azure AD B2C will append a suffix to that on save, which will look like B2C_1A_ADFSSamlCert).
Add signing and encryption keys
Follow Microsoft Documents to accomplish the following:
![]() Create signing key.
Create signing key.![]() Create encryption key.
Create encryption key.![]() Register the
Register the IdentityExperienceFramework application.![]() Register the
Register the ProxyIdentityExperienceFramework application.
Creating custom policy for ADFS
Microsoft has custom policy starter pack – that is super handy. However, you can also find the custom policy files that are customized with the technical profile for ADFS and also defined the user journeys in them in my GitHub repository. You can download the files from GitHub and search for the word woodbineb2c (the Azure AD B2C that I have used) and replace with your Azure AD B2C tenant name. Next, search for the word woodbine.westeurope.cloudapp.azure.com (that’s Azure VM where I have installed ADFS) and replace it with your ADFS FQDN.
Now, upload these XML files (6 files in total) in Azure AD B2C’s Identity Experience Framework’s Custom Policy blade. Upload them in following order:
1. TrustFrameworkBase.xml
2. TrustFrameworkExtensions.xml
3. SignUpOrSignInADFS.xml
4. SignUpOrSignin.xml
5. ProfileEdit.xml
6. PasswordReset.xml
Configure an AD FS relying party trust
To use AD FS as an identity provider in Azure AD B2C, you need to create an AD FS Relying Party Trust with the Azure AD B2C SAML metadata. The SAML metadata of Azure AD B2C technical profile typically looks like below:
https://your-tenant-name.b2clogin.com/your-tenant-name.onmicrosoft.com/your-policy/samlp/metadata?idptp=your-technical-profile
Replace the following values:
• your-tenant with your tenant name, such as your-tenant.onmicrosoft.com.
• your-policy with your policy name. For example, B2C_1A_signup_signin_adfs.
• your-technical-profile with the name of your SAML identity provider technical profile. For example, Contoso-SAML2.
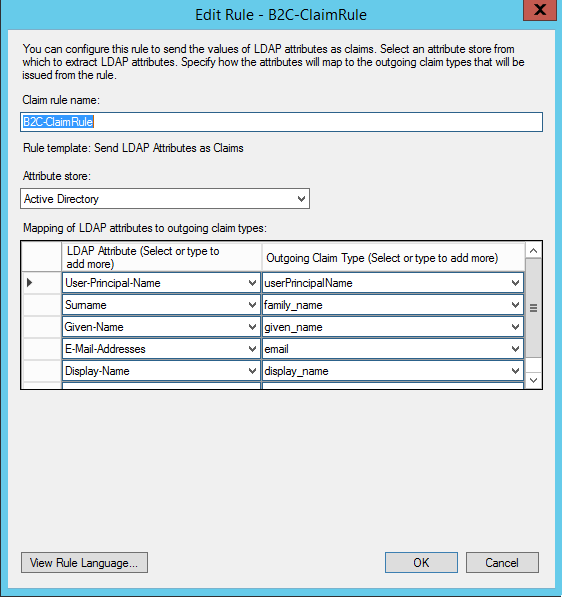
Follow this Microsoft Document to configure the relying party trust. However, when define the claim rules, map the DisplayName attribute to display_name or name (with lower-case) in outgoing claim.
Request Signing algorithm
You would need to make sure that the SAML requests sent by Azure AD B2C is signed with the expected signature algorithm configured in AD FS. By default, Azure AD B2C seems signing requests with rsa-sha1 – therefore, make sure in AD FS relying party trust property you have selected the same algorithm.

Enforce signatures for SAML assertions in ADFS
Lastly, ADFS by default won’t sign the assertions it sends to Azure AD B2C and Azure AD B2C will throw errors when that’s the case. You can resolve it by forcing ADFS to put signature on both message and assertions by running the following powershell command in ADFS server:
Set-AdfsRelyingPartyTrust -TargetName <RP Name> -SamlResponseSignature MessageAndAssertion
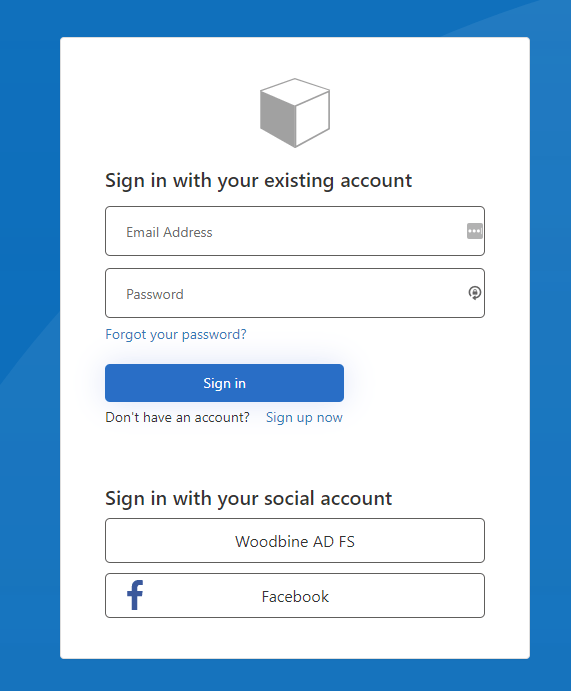
Create Application to test
I have a node application that uses MSAL 2.0 to test this setup. I have customized the sample from a Microsoft QuickStart sample. You can find the source code in here. You need to modify the B2C endpoints before you launch it. Here’s the instructions how to modify these endpoints.
Conclusion
There are quite some steps to set things up to get the correct behavior. I hope this would help you – if you are trying to setup AD FS as Identity Provider to your Azure AD B2C tenant.
Thank you!

Hi,
Thanks for the article
May I ask you how did you manage to get Azure AD B2C accept the self-signed certificate used by ADFS ?
It does throw those errors otherwise:
The underlying connection was closed: Could not establish trust relationship for the SSL/TLS secure channel.
The remote certificate is invalid according to the validation procedure.
LikeLike
Not sure if you read the article. Because I clearly wrote that Azure B2C won’t accept self signed certificates, therefore the article shows an example of creating a certificate from let’s encrypt.
LikeLike