Introduction
In today’s digital landscape, APIs play a crucial role in connecting applications and enabling seamless interactions. However, with the increasing importance of APIs, ensuring their security becomes paramount. In this blog post, we’ll explore how to create a secure API using .net and hosted on Azure Container Apps, expose them via Azure API Management with centralized authorization policies, and restrict traffic flow within a virtual network. I’ve also provided a GitHub repository with Bicep files for easy reference.
Azure API Management and Azure Container Apps
Azure API Management is a comprehensive platform that allows organizations to manage, secure, and publish APIs at scale. It acts as a gateway, enabling API developers to monitor, analyze, and control the API traffic. On the other hand, Azure Container Apps provide an efficient way to deploy and manage containerized applications in the cloud.
These two powerful Azure services can be network integrated, allowing you to secure your APIs effectively. Leveraging this integration, you can implement centralized policies and control access to the APIs from a virtual network.
Infrastructure as Code (IaC)
Infrastructure as Code (IaC) is a fundamental approach to provisioning and managing infrastructure in a declarative manner. By using code to define your infrastructure, you can easily version, share, and reproduce it reliably. In this blog post, we promote the use of IaC to establish a consistent and predictable deployment process.
To make things even easier, I have prepared end-to-end Bicep files with modular constructs. Bicep is a domain-specific language (DSL) that simplifies the authoring of Azure Resource Manager templates. Our GitHub repository contains these Bicep files, enabling you to deploy the entire API stack effortlessly.
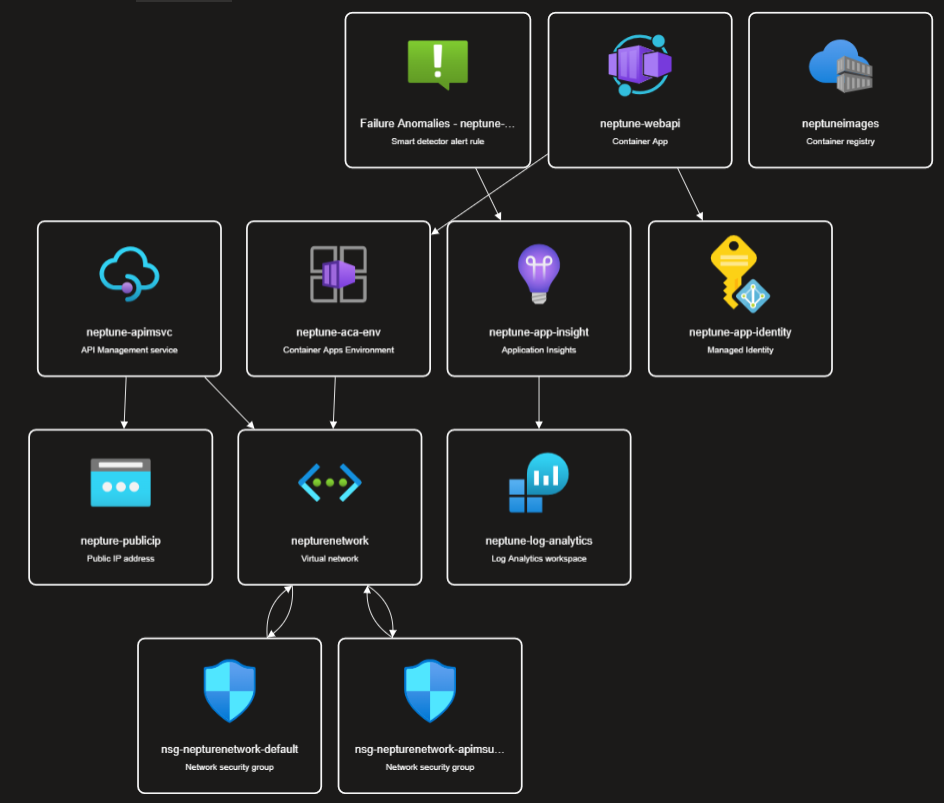
The modules for the entire stack can be found here, the entry point is main.bicep – which references the all the required azure resources in it.
module virtualNetwork 'modules/virtual-network.bicep' = {
  name: vnetName
  params: {
    vnetName: vnetName
    location: location
  }
}

module uami 'modules/identity.bicep' = {
  name: uamiName
  params: {
    uamiName: uamiName
    location: location
  }
}

module containerRegistry  'modules/registry.bicep' = {
  name: containerRegistryName
  params: {
    location: location
    registryName: containerRegistryName
    skuName: 'Basic'
    userAssignedIdentityPrincipalId: uami.outputs.principalId
    adminUserEnabled: false
  }
}

module keyvault 'modules/keyvault.bicep' = {
  name: keyvaultName
  params: {
    keyVaultName: keyvaultName
    objectId: uami.outputs.principalId
    enabledForDeployment: false
    enabledForDiskEncryption: false
    enabledForTemplateDeployment: false
    keysPermissions: [
      'get'
      'list'
    ]
    secretsPermissions: [
      'get'
      'list'
    ]
    location: location
    skuName: 'standard'
  }
}

module logAnalytics 'modules/log-analytics.bicep' = {
  name: logAnalyticsName
  params: {
    logAnalyticsName: logAnalyticsName
    localtion: location
  }
}

module appInsights 'modules/app-insights.bicep' = {
  name: appInsightName
  params: {
    appInsightName: appInsightName
    location: location
    laWorkspaceId: logAnalytics.outputs.laWorkspaceId
  }
}

module acaEnvironment 'modules/environment.bicep' = {
  name: acaEnvName
  params: {
    appInsightKey: appInsights.outputs.InstrumentationKey
    infrastructureSubnetId: virtualNetwork.outputs.defaultSubnetId
    location: location
    envrionmentName: acaEnvName
    laWorkspaceName: logAnalyticsName
  }
}

module apimService 'modules/apim.bicep' = {
  name: apimServiceName
  params: {
    apimServiceName: apimServiceName
    location: location
    sku: sku
    skuCount: skuCount
    publisherEmail: publisherEmail
    publisherName: publisherName
    publicIpAddressName: publicIpAddressName
    subnetName: virtualNetwork.outputs.apimSubnetName
    virtualNetworkName: virtualNetwork.name
  }
}

As we can see from the diagram, the IAC created all the required components and connected them accordingly.
Backend web api
The backend web API in this example is using Azure DevOps REST API as upstream, which requires the web API to accept an access token from end user and uses to invoke the Azure DevOps REST API. However, I wanted to introduce an authorization on the APIM level, so the backend APIs only sees traffics that already has a valid Azure DevOps Authentication Token.
Securing Backend with Centralized Authorization
The policy looks like below:
<policies>
    <inbound>
        <send-request mode="new" response-variable-name="tokenstate" timeout="20" ignore-error="true">
            <set-url>{{azuredevopsendpoint}}</set-url>
            <set-method>GET</set-method>
            <set-header name="Authorization" exists-action="override">
                <value>@(context.Request.Headers.GetValueOrDefault("Authorization","scheme param"))</value>
            </set-header>
            <set-header name="Content-Type" exists-action="override">
                <value>application/json</value>
            </set-header>
        </send-request>
        <choose>
            <when condition="@(((IResponse)context.Variables["tokenstate"]).StatusCode != 200)">
                <return-response>
                    <set-status code="401" reason="Unauthorized" />
                    <set-header name="WWW-Authenticate" exists-action="override">
                        <value>Bearer error="invalid_token"</value>
                    </set-header>
                    <set-header name="Content-Type" exists-action="override">
                        <value>application/json</value>
                    </set-header>
                </return-response>
            </when>
        </choose>
        <set-header name="Host" exists-action="override">
            <value>{{containerappbackendhostname}}</value>
        </set-header>
    </inbound>
  <backend>
    <forward-request />
  </backend>
  <outbound />
  <on-error />
</policies>
Basically, we do a call to Azure DevOps (to connectionData endpoint) from APIM Policy with the given token- if we get a valid response that proves that the token is valid. Only then we forward the request to the upstream/Backend.
The policy uses some name value pair to avoid hard-coded constants, but they are all taken care of within the Bicep modules.
By using a centralized policy, we can validate access tokens centrally within the API Management layer. This means individual APIs don’t need to handle authorization independently. The API Management gateway takes care of validating access tokens and propagating them to the backend as needed. This centralized approach simplifies the API development process and ensures consistent security measures across the board.
Monitoring
The solution is also integrated with Log Analytics and Applicaiton Insights (including the API logs to the App Insights), which allows end-2-end trackability.
Conclusion
In this blog post, we’ve explored how to build a secure API architecture using Azure Container Apps, Azure API Management, and network integration. By leveraging the power of Infrastructure as Code, I’ve provided end-to-end Bicep files for easy provisioning and management of the entire stack.
Centralized authorization policies in Azure API Management enable a streamlined approach to access control, ensuring that all APIs are uniformly protected. By restricting traffic to the backend within a virtual network, we add an additional layer of security to our API infrastructure.
I invite you to explore the code available in our GitHub repository to get started on creating your own secure and robust API solution. Remember, security is an ongoing process, and as you continue to evolve your APIs, always stay updated with the latest best practices and security measures. Happy coding!