Introduction
In the ever-evolving landscape of software development, ensuring the security and autonomy of your projects is paramount. Azure DevOps has become a cornerstone for many development teams, providing a robust set of tools for collaboration and project management. However, managing security at scale can be a daunting task.
Enter Orion Guardian – a game-changing Azure DevOps extension designed to simplify and enhance security management, allowing users to tailor permissions with precision and efficiency.
Here’s a quick overview of the key features it provides:
Custom Roles Tailored to Your Needs
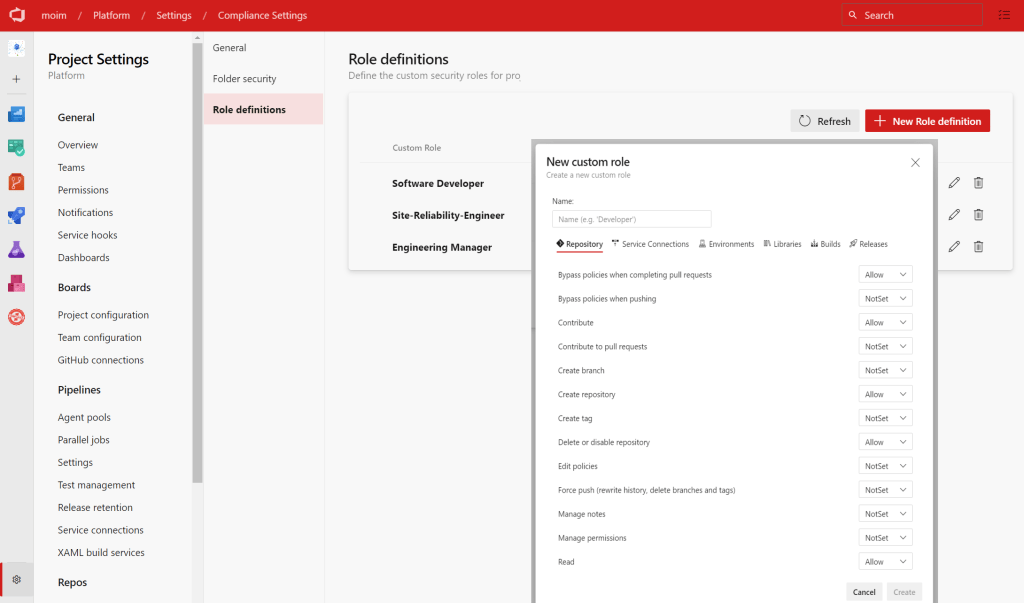
Orion Guardian introduces a feature that empowers users to define custom roles tailored to their specific organizational structure. Whether you’re a developer, Software Engineering Lead, or a Scrum Master, you can now create roles with finely-tuned permissions that align with your team’s responsibilities. This level of customization ensures that security measures are not only robust but also perfectly aligned with your organization’s unique requirements.
Granular Control with Folder Hierarchy
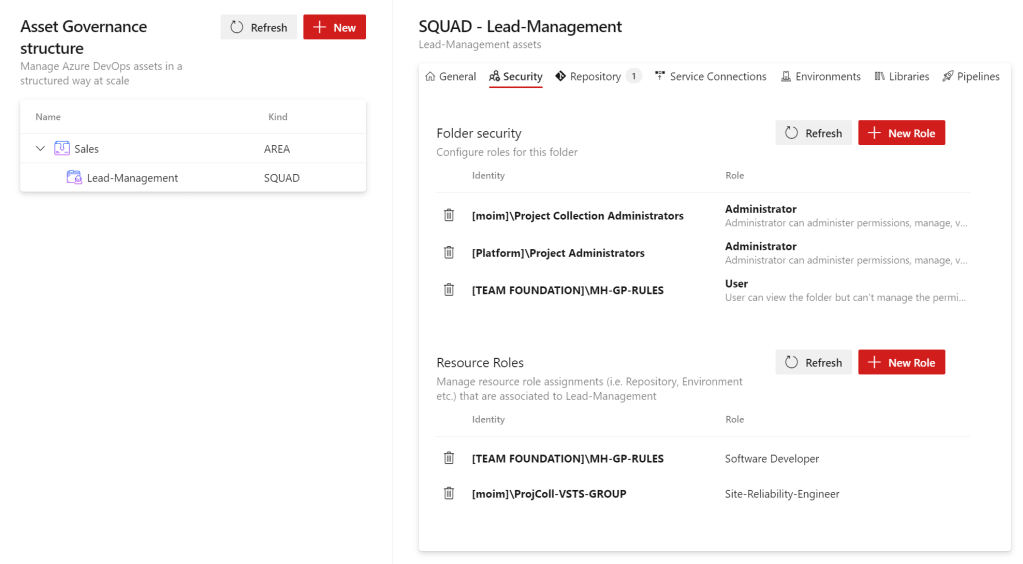
One of the standout features of Orion Guardian is the ability to establish a folder hierarchy within your Azure DevOps environment. This hierarchy serves as a powerful organizational tool, allowing users to associate repositories, libraries, service endpoints, and environments with specific folders. This not only enhances the overall organization of your projects but also lays the foundation for precise and granular control over permissions.
Effortless Permissions Management

Assigning permissions at scale has never been easier. With Orion Guardian, users can effortlessly assign custom roles to specific identities within a folder. This innovative approach ensures that all associated resources inherit the predefined permissions without the need for manual intervention. This streamlines the security management process, saving valuable time and reducing the likelihood of errors.
Seamless Integration and Accessibility
Orion Guardian is readily available for download on the Visual Studio Marketplace, offering users a seamless integration into their Azure DevOps environment. The extension is designed to be user-friendly, providing an intuitive interface for creating custom roles, defining folder hierarchies, and managing permissions. The accessibility of Orion Guardian ensures that security management becomes a collaborative and efficient process for development teams of all sizes.
Get Started with Orion Guardian Today
Empower your development team with Orion Guardian and take control of your Azure DevOps security at scale. Download the extension for free from the Visual Studio Marketplace here and experience a new era of security management that is tailored, efficient, and seamlessly integrated into your development workflow. Orion Guardian – where security meets simplicity.
Installation
The extension has two components in it.
User Interface Extension: Streamlined Security Management
The user interface extension is the gateway to a simplified and intuitive security management experience. With just a few clicks, users can seamlessly install Orion Guardian directly from the Visual Studio Marketplace, integrating it effortlessly into their Azure DevOps environment. This part of the extension empowers users to define custom roles, create folder hierarchies, and assign granular permissions, all within the familiar Azure DevOps interface.
Backend as Docker Container: Unleashing Control and Flexibility
Complementing the frontend, Orion Guardian’s backend is delivered as a Docker container, offering users the flexibility to host and manage it within their infrastructure. This strategic decision was made with a focus on providing customers with maximum control over the high-privilege APIs that drive the core functionality of the extension.
Docker containers encapsulate the backend components, ensuring consistent performance across various environments. By providing the backend as a Docker container, we enable users to seamlessly integrate Orion Guardian into their existing infrastructure while maintaining the highest level of security.
Deploying the backend as a Docker container ensures that users have complete ownership and control over their security management infrastructure. This approach aligns with our commitment to empowering organizations to take charge of their security measures, allowing them to tailor the deployment to their specific needs and compliance requirements.
Installing Backends
You can host the container on Any infrastructure of your choice. Essentially, you would need 2 containers to be hosted.
- docker.io/moimhossain/azdo-control-panel:v2 (Hosts the Web API)
- docker.io/moimhossain/azdo-control-panel-daemon:v2 (Headless daemon that modifies the security at scale)
Running azdo-control-panel:v2
This is the API (a .net web API) that provides the folder structure and permission management to the extension UI. You can run it with the following configuration:
docker run  \
            --env AZURE_COSMOS_CONNECTIONSTRING="AccountEndpoint=https://***.documents.azure.com:443/;AccountKey=***;" \
           --env AZURE_COSMOS_DATABASEID="stellaris"  \
           --env AZURE_DEVOPS_ORGNAME="AZDO ORG NAME"
           --env AZURE_DEVOPS_USE_PAT="true"
           --env AZURE_DEVOPS_PAT="YOUR PAT TOKEN"
           -p 8080:8080  moimhossain/azdo-control-panel:v2
Running azdo-control-panel-daemon:v2
This is a headless service that listens for permission changes on Folders and applies or updates them when necessary. You can run it exactly like the previous container. Only difference is this container doesn’t listen for HTTP requests hence no ingress required.
docker run --rm \
           --env AZURE_COSMOS_CONNECTIONSTRING="AccountEndpoint=https://***.documents.azure.com:443/;AccountKey=***;" \
           --env AZURE_COSMOS_DATABASEID="stellaris"  \
           --env AZURE_DEVOPS_ORGNAME="AZDO ORG NAME" \
           --env AZURE_DEVOPS_USE_PAT="true" \
           --env AZURE_DEVOPS_PAT="YOUR PAT TOKEN"  \
           moimhossain/azdo-control-panel-daemon:v2
Environment variables for both containers
Both containers uses identical environment variables. The Explanations of the environment variables are given below:
| Environment variable | Description |
|---|---|
| AZURE_COSMOS_CONNECTIONSTRING | The connection string to an Azure Cosmos Database, the folder structure and role definitions will be stored into this database. The API will create the required containers on the fly, just create an empty cosmos database and provide the connection string, that will be enough. |
| AZURE_COSMOS_DATABASEID | The ID of the database. The API will create this database if it doesn’t exist already. |
| AZURE_DEVOPS_ORGNAME | The name of your Azure DevOps organization. (Example, when you access your organization with following URI https://dev.azure.com/contoso then provide “contoso” as the value of this settings. Not the URI. ) |
| AZURE_DEVOPS_USE_PAT | true or false (If you are using PAT token, provide true) *Can be omitted completely when using Managed Identity or Service Principal |
| AZURE_DEVOPS_PAT | The PAT token of an account that has permissions to read/write security settings across projects. Preferably, a Project collection Administrator user. *Can be omitted completely when using Managed Identity or Service Principal |
| AZURE_DEVOPS_USE_MANAGED_IDENTITY | If you are deploying the API on Azure, you can use managed identity and use that identity instead of hardcoded PAT. When this is set to true, please set AZURE_DEVOPS_USE_PAT=false. You can ignore (do not provide) it when you are using PAT. *Can be omitted completely when using PAT |
| AZURE_DEVOPS_CLIENT_ID_OF_MANAGED_IDENTITY | If you are using managed identity, this would be the client ID of that identity. You also need to make sure this identity has access to the Azure DevOps organization. *Can be omitted completely when using PAT |
| AZURE_DEVOPS_TENANT_ID_OF_MANAGED_IDENTITY | The tenant ID of the managed identity. *Can be omitted completely when using PAT |
| AZURE_DEVOPS_USE_SERVICE_PRINCIPAL | true or false for using a Service Principal (not a managed identity)*Can be omitted completely when using PAT |
| AZURE_DEVOPS_CLIENT_ID_OF_SERVICE_PRINCIPAL | The client ID of the service principal *Can be omitted completely when using PAT |
| AZURE_DEVOPS_CLIENT_SECRET_OF_SERVICE_PRINCIPAL | The client secret for the service principal *Can be omitted completely when using PAT |
| AZURE_DEVOPS_TENANT_ID_OF_SERVICE_PRINCIPAL | Tenant ID of the service principal *Can be omitted completely when using PAT |
Using Azure Container Apps
You could host the above 2 containers on any infrastructure of your choice. However, I will give an example using Azure Container apps.
Requirements
| Azure Account | If you don’t have one, create an account for free. You need the Contributor or Owner permission on the Azure subscription to proceed. Refer to Assign Azure roles using the Azure portal for details. |
| Azure CLI | Install the Azure CLI. |
Steps
Run the following commands sequentially. Ensure if you have Azure CLI logged in and singed in. Also the required providers are installed.
az login
az upgrade
az extension add --name containerapp --upgrade
az provider register --namespace Microsoft.App
az provider register --namespace Microsoft.OperationalInsights
Next to that, let’s create some variables for our resource group name, ACA environment names etc.
RESOURCE_GROUP="orionguardian"
LOCATION="westeurope"
ENVIRONMENT="env-orionguardian"
COSMOSDBACCOUNT="orionguardian"

az group create --name $RESOURCE_GROUP --location "$LOCATION"
az cosmosdb create --name $COSMOSDBACCOUNT --resource-group $RESOURCE_GROUP  --location  "$LOCATION"
az containerapp env create --name $ENVIRONMENT --resource-group $RESOURCE_GROUP --location "$LOCATION"
The above gives us the ACA environment created in a resource group. Next, we will deploy the 2 containers that we discussed above.
az containerapp create \
                    --name "OrionGuardianAPI"  \
                    --resource-group $RESOURCE_GROUP  \
                    --environment $ENVIRONMENT   \
                    --registry-server docker.io   \
                    --image "moimhossain/azdo-control-panel:v2"   \
                    --target-port 8080 \
                    --ingress 'external'  \
                    --min-replicas 1   \
                    --max-replicas 4  \
                    --env-vars AZURE_COSMOS_CONNECTIONSTRING="???" AZURE_COSMOS_DATABASEID="orionguardian"   \
                    --query properties.configuration.ingress.fqdn


az containerapp create \
                    --name "OrionGuardianAPI"  \
                    --resource-group $RESOURCE_GROUP  \
                    --environment $ENVIRONMENT   \
                    --registry-server docker.io   \
                    --image "moimhossain/azdo-control-panel-daemon:v2"   \
                    --target-port 8080 \
                    --ingress 'external'  \
                    --min-replicas 1   \
                    --max-replicas 4  \
                    --env-vars AZURE_COSMOS_CONNECTIONSTRING="???" AZURE_COSMOS_DATABASEID="orionguardian"   \
                    --query properties.configuration.ingress.fqdn
You need to provide the correct environment variables via the –env-vars flag. The details of the environment variables are described in above table.
Configure the API URI to the extension
Once both containers are running, take the URI of the API container and set it into the extension. You can do that by following the steps below:
- Go to Azure DevOps organization settings
- From the left menu, pick the settings page for the extension. (ie. Governance config)
- Write the base URI of the API on Backend URI

That should be it.
Support
If you are running into issues you can register an issue to the GitHub repository.
