Background
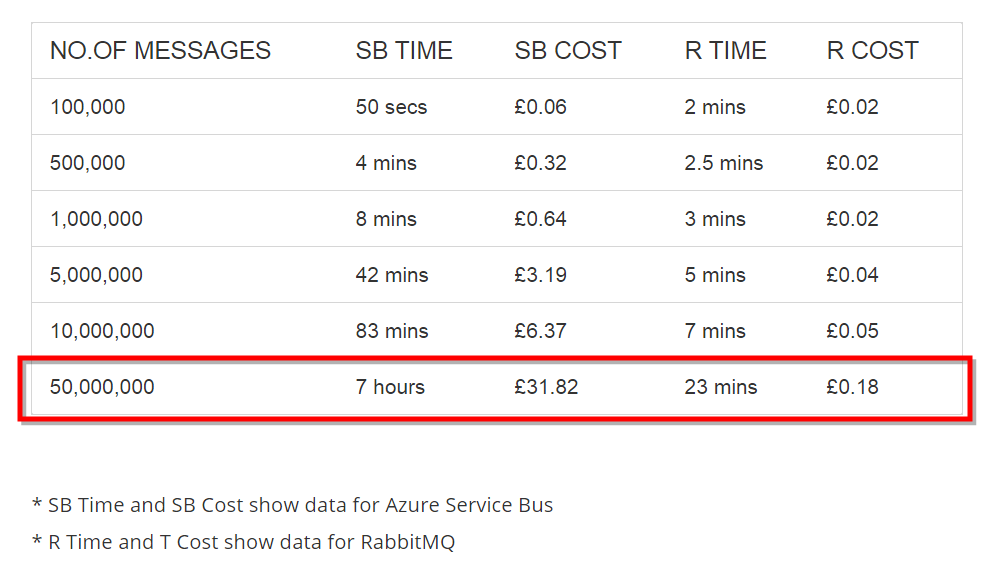
Recently I had to look into a reliable AMQP solution (publish-subscribe queue model) in order to build a message broker for a large application. I started with the Azure service bus and RabbitMQ. It didn’t took long to understand that RabbitMQ is much more attractive over service bus because of their efficiency and cost comparisons when there are large number of messages. See the image taken from Mariusz Wojcik’s blog.
Setting up RabbitMQ on a windows machine is relatively easy. RabbitMQ web site nicely documented how to do that. However, when it comes to install RabbitMQ cluster on some cloud VMs, I found Linux (Ubuntu) VMs are handier for their faster booting. For quite a long time I haven’t used the *nix OS, so found the journey really interested to write a post about it.
Spin up VMs on Azure
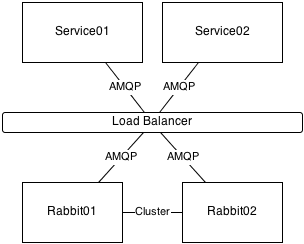
We need two Linux VMs, both will have RabbitMQ installed as server and they will be clustered. The high level picture of the design looks like following:
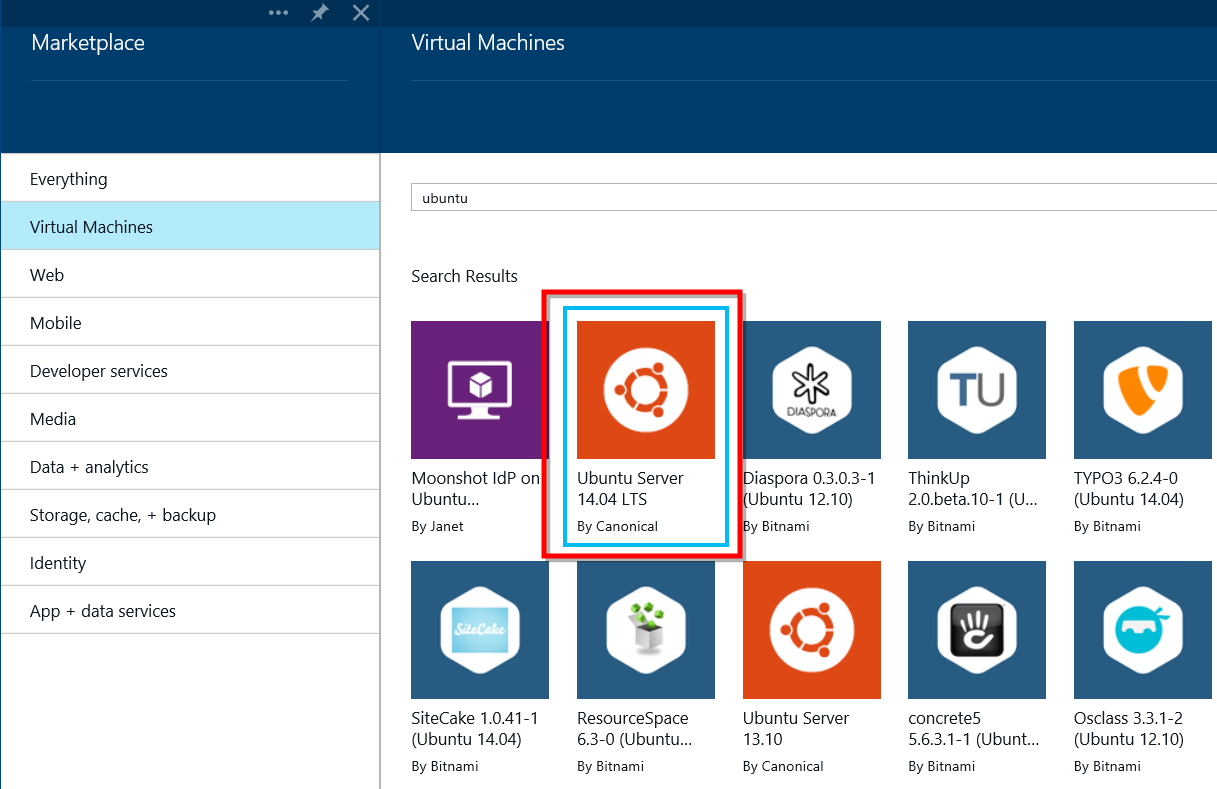
Login to the Azure portal and create two VM instances based on the Ubuntu Server 14.04 LTS images on Azure VM depot.
I have named them as MUbuntu1 and MUbuntu2. The VMs need to be in the same cloud service and the same availability set, to achieve redundancy and high availability. The availability set ensures that Azure Fabric Controller will recognize this scenario and will not take all the VMs down together when it does maintenance tasks, i.e. OS patch/updates for example.

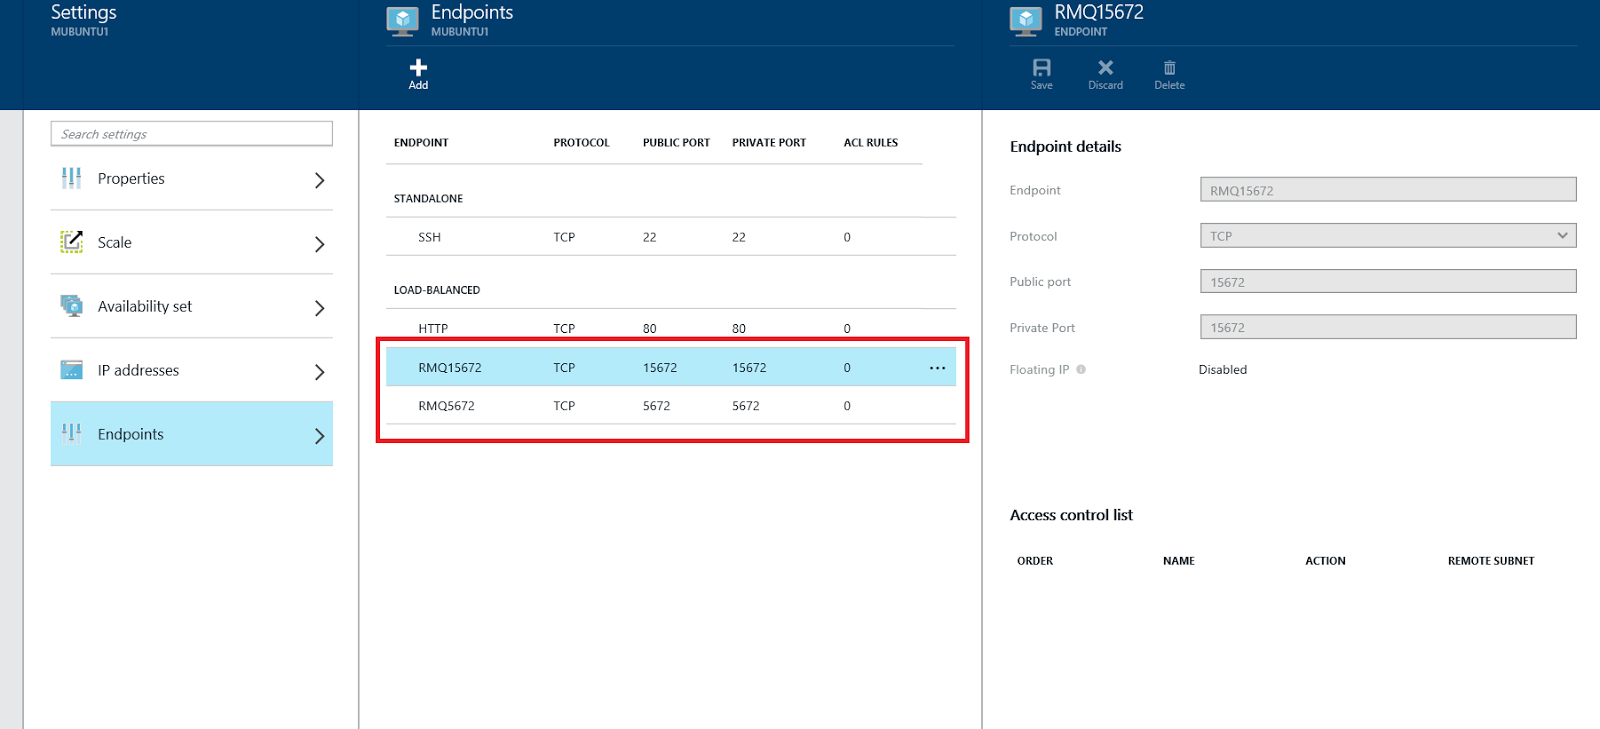
Once the VM instances are up and running, we need to define some endpoints for RabbitMQ. Also they need to be load balanced. We go to the MUbuntu1 details in management portal and add two endpoints-port 15672 and port 5672 one for RabbitMQ connection from client applications another for RabbitMQ management portal application. Scott Hanselman has described the details how to create load balanced VMs. Once we create them it will look like following:
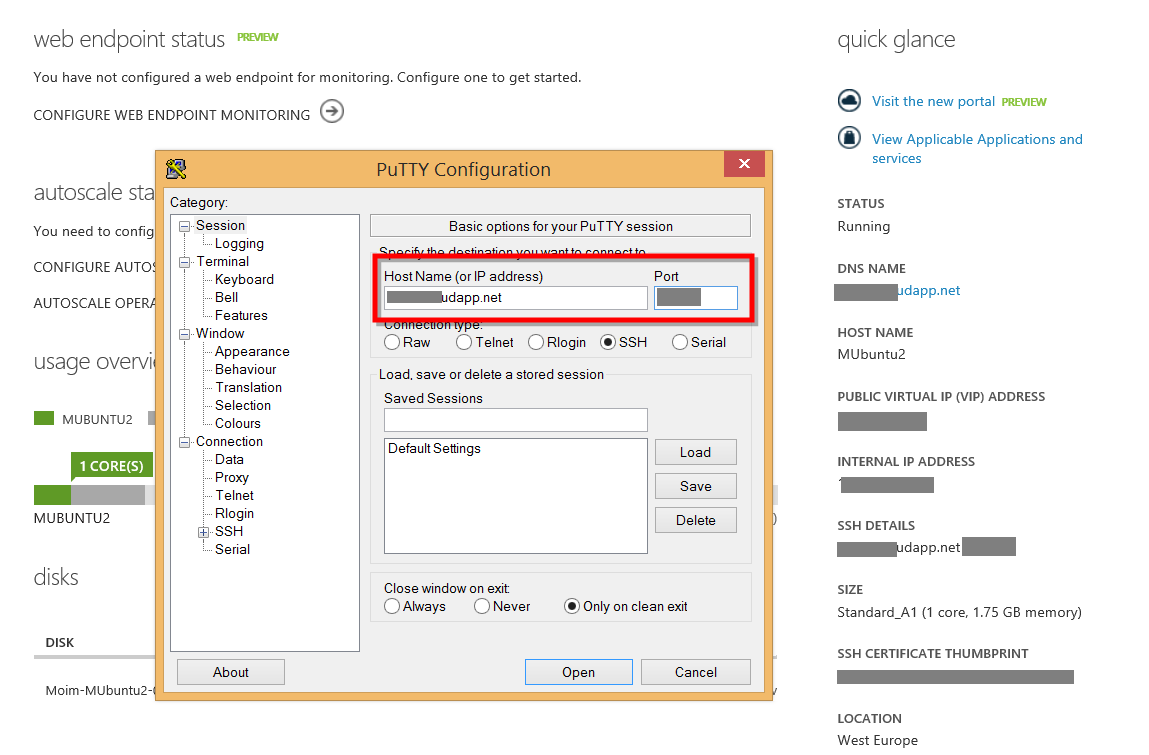
Now we can SSH into both of these machines, (Azure already mapped the SSH port 22 to a port which can be found on the right side of the dashboard page for the VM).
Install RabbitMQ
Once we SSH into the terminals of both of the machines we can install RabbitMQ by executing the following commands:
sudo add-apt-repository 'deb http://www.rabbitmq.com/debian/ testing main'
sudo apt-get update
sudo apt-get -q -y --force-yes install rabbitmq-server
The above apt-get will install the Erlang and RabbitMQ server on both machines. Erlang nodes use a cookie to determine whether they are allowed to communicate with each other – for two nodes to be able to communicate they must have the same cookie. Erlang will automatically create a random cookie file when the RabbitMQ server starts up. The easiest way to proceed is to allow one node to create the file, and then copy it to all the other nodes in the cluster. On our VMs the cookie will be typically located in /var/lib/rabbitmq/.erlang.cookie
We are going to create the cookie in both machines by executing the following commands
echo 'ERLANGCOOKIEVALUE' | sudo tee /var/lib/rabbitmq/.erlang.cookie
sudo chown rabbitmq:rabbitmq /var/lib/rabbitmq/.erlang.cookie
sudo chmod 400 /var/lib/rabbitmq/.erlang.cookie
sudo invoke-rc.d rabbitmq-server start
Install Management portal for RabbitMQ
Now we can also install the RabbitMQ management portal so we can monitor the Queue from a browser. Following commands will install the management plugin:
sudo rabbitmq-plugins enable rabbitmq_management
sudo invoke-rc.d rabbitmq-server stop
sudo invoke-rc.d rabbitmq-server start
So far so good. Now we create a user that we want to use to connect the queue from the clients and monitoring. You can manage users anytime later too.
sudo rabbitmqctl add_user
sudo rabbitmqctl set_user_tags  administrator
sudo rabbitmqctl set_permissions -p /  '.*' '.*' '.*'
Configuring the cluster
So far we have two RabbitMQ server up and running, it’s time to connect them as cluster. To do so, we need to go to one of the machines and join the cluster. The following command will do that:
sudo rabbitmqctl stop_app
sudo rabbitmqctl join_cluster rabbit@MUbuntu1
sudo rabbitmqctl start_app
sudo rabbitmqctl set_cluster_name RabbitCluster
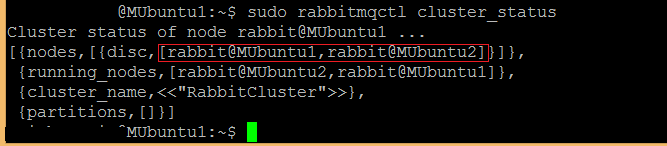
We can verify if the cluster is configured properly via RabbitMQ management portal:

Or from SSH terminal:
Queues within a RabbitMQ cluster are located on a single node by default. They need to be made mirrored across multiple nodes. Each mirrored queue consists of one master and one or more slaves, with the oldest slave being promoted to the new master if the old master disappears for any reason. Messages published to the queue are replicated to all slaves. Consumers are connected to the master regardless of which node they connect to, with slaves dropping messages that have been acknowledged at the master. Queue mirroring therefore enhances availability, but does not distribute load across nodes (all participating nodes each do all the work). This solution requires a RabbitMQ cluster, which means that it will not cope seamlessly with network partitions within the cluster and, for that reason, is not recommended for use across a WAN (though of course, clients can still connect from as near and as far as needed). Queues have mirroring enabled via policy. Policies can change at any time; it is valid to create a non-mirrored queue, and then make it mirrored at some later point (and vice versa). More on this are documented in RabbitMQ site. For this example, we will replicate all queues by executing this on SSH:
rabbitmqctl set_policy ha-all "" '{"ha-mode":"all","ha-sync-mode":"automatic"}'
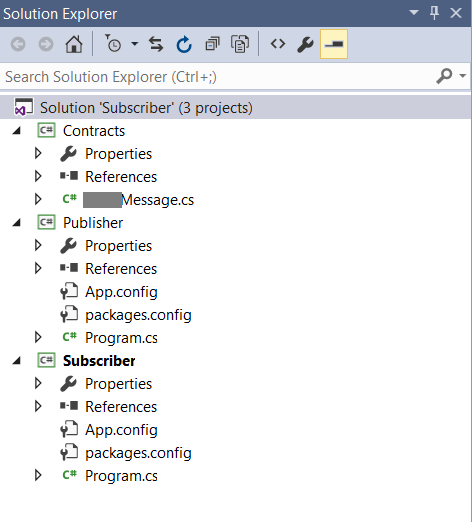
That should be it. The cluster is now up and running, we can create a quick .NET console application to test this. I have created 2 console applications and a library that has one class as the message contract. VS Solution looks like this:
We will use EasyNetQ to connect to the RabbitMQ, which we can nuget in publisher and subscriber project.
In the contract project (class library), we have following classes in a single code file
namespace Contracts
{
    public class RabbitClusterAzure
    {
        public const string ConnectionString =
            @"host=;username=;password=";
    }


    public class Message
    {
        public string Body { get; set; }
    }
}
The publisher project has the following code in program.cs
namespace Publisher
{
 class Program
 {
        static void Main(string[] args)
  {
   using (var bus = RabbitHutch.CreateBus(RabbitClusterAzure.ConnectionString))
   {
    var input = "";
    Console.WriteLine("Enter a message. 'Quit' to quit.");
                while ((input = Console.ReadLine()) != "Quit")
                {
                    Publish(bus, input);
                }
            }
  }

        private static void Publish(IBus bus, string input)
        {
            bus.Publish(new Contracts.Message
            {
                Body = input
            });
        }
    }
}
Finally, the subscriber project has the following code in the program.cs
namespace Subscriber
{
 class Program
 {
  static void Main(string[] args)
  {
   using (var bus = RabbitHutch.CreateBus(RabbitClusterAzure.ConnectionString))
   {
    var retValue = bus.Subscribe("Sample_Topic", HandleTextMessage);

    Console.WriteLine("Listening for messages. Hit  to quit.");
    Console.ReadLine();
   }
  }

  static void HandleTextMessage(Contracts.Message textMessage)
  {
   Console.ForegroundColor = ConsoleColor.Red;
   Console.WriteLine("Got message: {0}", textMessage.Body);
   Console.ResetColor();
  }
 }
}
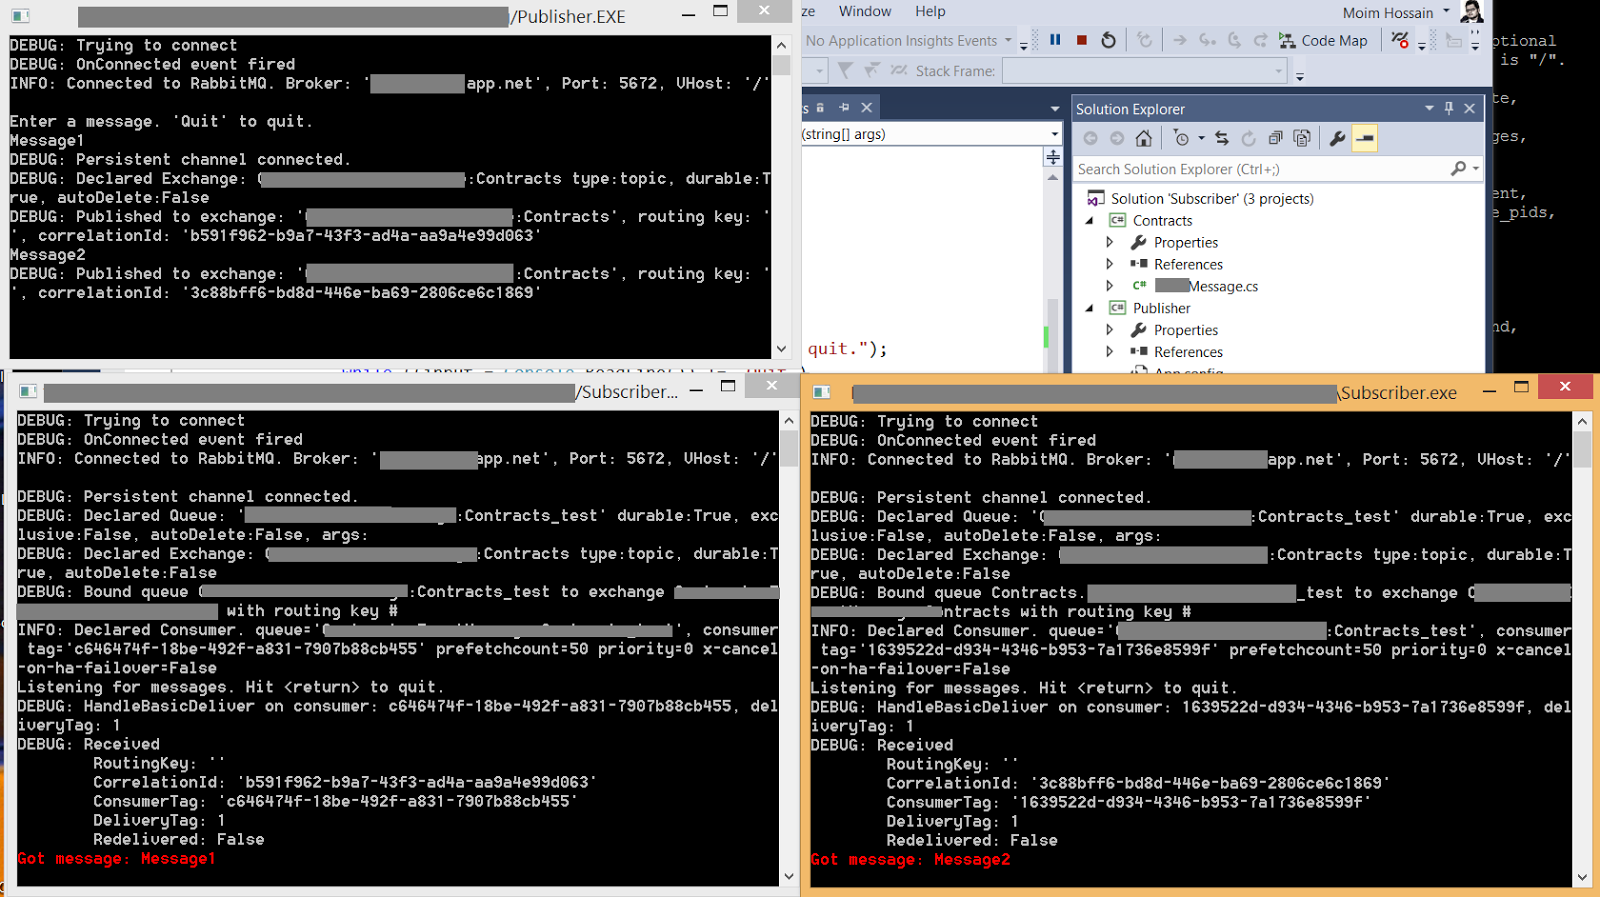
Now we can run the Publisher and multiple instance of subscriber and it will dispatch messages in round-robin (direct exchange). We can also take one of the VM down and it will not lose any messages.
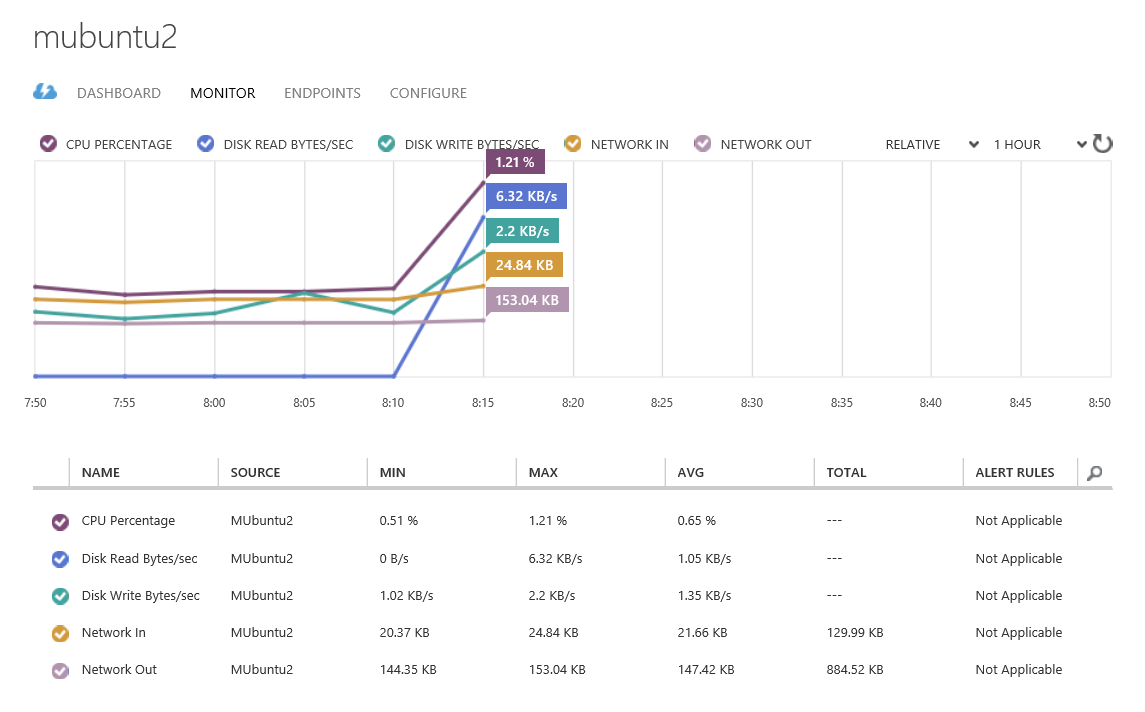
We can also see the traffics to the VMs (cluster instance too) directly from Azure portal.
Conclusion
I have to admit, I found it extremely easy and convenient to configure up and run RabbitMQ clusters. The steps are simple and setting it up just works.

Bạn là một người năng động có lòng nhiệt huyết, bạn luôn mong muốn kinh doanh một chủ đề nào đó hay bạn đang cần làm web cho công ty bạn, nhưng bạn phân vân lo lắng không biết nơi nào mới thực sự là điểm tựa tin cậy của các bạn.?
Tôi xin giới thiệu: Công Ty TNHH HTSolution là một Công ty thiết kế web chuyên nghiệp chuyên cung cấp các dịch vụ chuyên nhiệp như: thiết kế website giá rẻ, uy tín, phần mềm quản lý quán cafe, nâng cấp website,….vv. Nếu bạn có nhu cầu sử dụng dịch vụ phần mềm quản lý hay bạn cần làm web của công ty chúng tôi vui lòng liên hệ:
CÔNG TY TNHH HTSOLUTION
Địa chỉ: 78th Thăng Long – P.4 -Q.Tân Bình – TP.HCM
Điện thoại: (08) 6267 3377 (Anh Hoàng) or 0985327297 (Anh Trường)
Email:Info@htsolution.vn
LikeLike
I tried the sample, but “sudo invoke-rc.d rabbitmq-server start” fails.
Until “sudo chmod 400 /var/lib/rabbitmq/.erlang.cookie” all seems ok. trying to start rabbit server i got
* Starting message broker rabbitmq-server * FAILED – check /var/log/rabbitmq/startup_\{log, _err\}
[fail]
invoke-rc.d: initscript rabbitmq-server, action “start” failed.
Something changed from the post publishing?
LikeLike
Very nice information provided by you for more updates on Azure Online Training
LikeLike
whoah this blog is excellent i like studying your posts. Keep up the good work! You recognize, many people are looking round for this info, you could help them greatly.
LikeLike