In today’s rapidly evolving digital landscape, secure and efficient management of client credentials is paramount. Azure API Management (APIM) provides a robust platform for managing APIs, enabling organizations to expose and protect their services. Integrating Azure Active Directory B2C (Azure AD B2C) with the APIM Developer Portal allows API consumers to sign in and manage their credentials seamlessly. This article will demonstrate how to integrate Azure B2C with the APIM Developer Portal and create a custom widget that allows consumers to manage their secrets directly from the portal.
Architecture
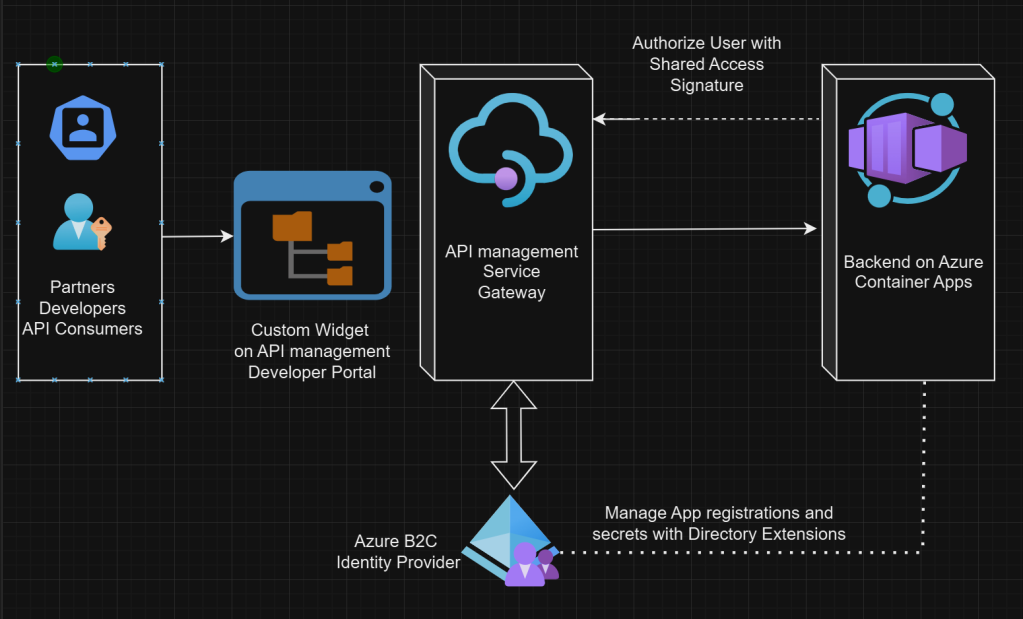
A brief diagram that shows the flows can be depicted as follows:
Integrating Azure AD B2C with APIM Developer Portal
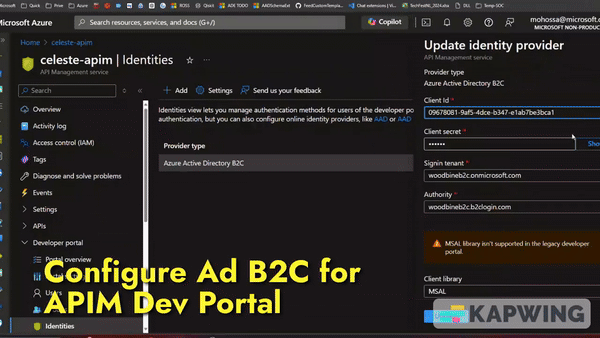
Azure AD B2C is an identity management service that allows you to customize and control how customers sign up, sign in, and manage their profiles when using your applications. By integrating Azure AD B2C with the APIM Developer Portal, you can leverage its capabilities to authenticate users. Microsoft documented the process how to integrate Azure B2C to Azure API management developer portal. Please read the details here.
Once you integrate the Identity Provider you can sign-in (also Sign-up new users) into the Developer portal.
By following steps defined into that document, your API consumers can now sign in to the Developer Portal using Azure B2C.
Creating a Custom Widget for Managing Secrets
To enhance the user experience, you can create a custom widget within the Developer Portal that allows consumers to manage their client secrets directly. This involves creating a secure interface for displaying, generating, and rotating client secrets.
The API Management developer portal features a visual editor and built-in widgets so that you can customize and style the portal’s appearance. However, you may need to customize the developer portal further with custom functionality. For example, you might want to integrate your developer portal with a support system that involves adding a custom interface.
Creating a widget is quite straigtforward and the process is documented here.
Prerequisites
- Install Node.JS runtime locally
- Basic knowledge of programming and web development
Your custom widget code is stored in public Azure blob storage that’s associated with your API Management instance. When you add a custom widget to the developer portal, code is read from this storage via an endpoint that doesn’t require authentication, even if the developer portal or a page with the custom widget is only accessible to authenticated users. Don’t include sensitive information or secrets in the custom widget code.
Create widget
- In the administrative interface for the developer portal, select Custom widgets > Create new custom widget.
- Enter a widget name and choose a Technology. For more information, see Widget templates, later in this article.
- Select Create widget.
- Open a terminal, navigate to the location where you want to save the widget code, and run the following command to download the code scaffold:
npx @azure/api-management-custom-widgets-scaffolder
cd azure-api-management-widget-cw-partnersecretmgmt
- Navigate to the newly created folder (azure-api-management-widget-cw-partnersecretmgmt) containing the widget’s code scaffold.
- Open the folder in your code editor of choice, such as VS Code.
- Install the dependencies and start the project:
npm install
npm start
This will give us a custom widget rendered into the developer portal.

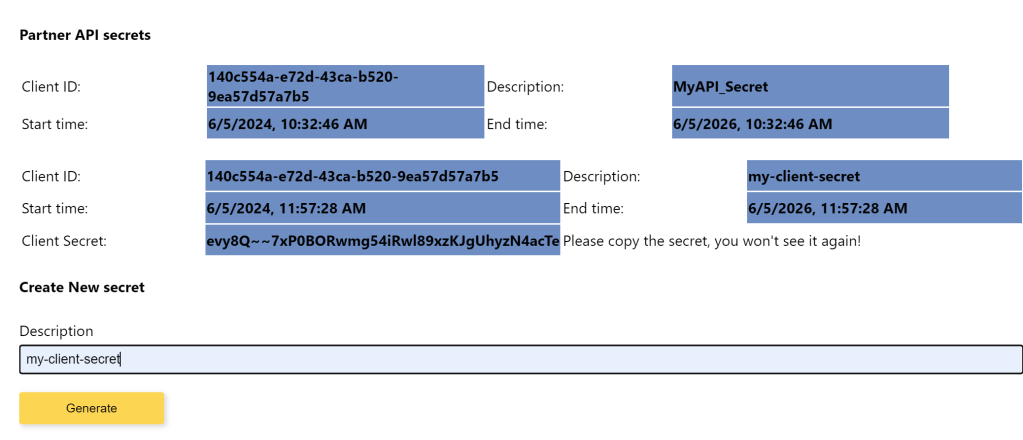
We modify the app.tsx to create the secret management UI:
        <h4>Create New secret</h4>
        <div className="form-group">
           <label htmlFor="description" className="form-label">Description</label>
           <input type="text" className="form-control" name="description" placeholder="Please enter description" defaultValue="" value={description} onChange={(e) => setDescription(e.target.value)} />
        </div>
        <div className="form-group">
          <button type="button" onClick={onGenerate} className="button button-primary">Generate</button>
        </div>
The full codebase can be found here.
Backend for secret generation and management
For effective client credential management, the backend plays a crucial role. In this section, we’ll explore how to set up a .NET Web API that leverages the Microsoft Graph client to manage app registrations and associate them with API consumers. The API will enable consumers to register their applications in the directory, associate the applications with specific consumers using Azure AD directory extensions, and manage client secrets securely.
I have a .net web api that uses Graph Client to manage the following:
- Creates Azure AD Directory Extension to associate a consumer (a partner/vendor or an individual API consumer) ID to an App Registration.
- Registers app (if not exists) and generate client credentails
Create Directory Extension for Consumer ID
Before we can store custom information associated to an App, we need to define the directory extension first.
var tenantId = Environment.GetEnvironmentVariable("AZURE_TENANT_ID");
var clientId = Environment.GetEnvironmentVariable("AZURE_CLIENT_ID");
var clientSecret = Environment.GetEnvironmentVariable("AZURE_CLIENT_SECRET");
var directoryExtensionAppObjectId = Environment.GetEnvironmentVariable("AZURE_DIRECTORY_EXTENSION_APP_OBJECT_ID");

const string EXT_PROP_PARTNER_NAME = "VendorName";
const string EXT_PROP_PARTNER_VALUE = "Contoso Inc.";
List<string> extensionPropertyNames = [EXT_PROP_PARTNER_NAME];

var clientSecretCredential = new ClientSecretCredential(tenantId, clientId, clientSecret);
var graphClient = new GraphServiceClient(clientSecretCredential);

var response = await graphClient.Applications[directoryExtensionAppObjectId].ExtensionProperties.GetAsync();
if(response != null && response.Value != null)
{
    var extPropDefinitions = response.Value;
    foreach (var propName in extensionPropertyNames)
    {
        var exists = extPropDefinitions
            .Exists(extProp => extProp != null
                && extProp.Name != null
                && extProp.Name.EndsWith(propName, StringComparison.OrdinalIgnoreCase));
        if(!exists)
        {
            var requestBody = new ExtensionProperty
            {
                Name = propName,
                DataType = "String",
                TargetObjects = ["Application"]
            };
            var createResult = await graphClient
                .Applications[directoryExtensionAppObjectId]
                .ExtensionProperties
                .PostAsync(requestBody);
        }
    }
}
With that Directory Extension defined, we can now create App registration (when widget invokes the API) and associate that newly created app to a customer using the extension properties.
var partnerNameExtPropDefinition = response.Value
    .FirstOrDefault(extProp => extProp != null
    && extProp.Name != null
    && extProp.Name.EndsWith(EXT_PROP_PARTNER_NAME, StringComparison.OrdinalIgnoreCase));
if (partnerNameExtPropDefinition != null && partnerNameExtPropDefinition.Name != null)
{
    var extPropSysName = partnerNameExtPropDefinition.Name;
    var newApplication = new Application
    {
        DisplayName = $"TestApp-{DateTime.Now.ToShortDateString()}",
        SignInAudience = "AzureADMyOrg",
        Tags = ["TestApp"],
        AdditionalData = new Dictionary<string, object>
        {
            {
                extPropSysName , EXT_PROP_PARTNER_VALUE
            },
        },
        Web = new Microsoft.Graph.Models.WebApplication
        {
            RedirectUris = ["https://microsoft.com"]
        }
    };
    var app = await graphClient.Applications.PostAsync(newApplication);
}
You can see the complete source code for the API here. And read more about Directory Extension here.
With that, our API consumers can create client secert securely from the custom widget.
Conclusion
The backend setup for secret management is a critical component of ensuring secure and efficient client credential management in Azure API Management. By leveraging Microsoft Graph and Azure AD directory extensions, you can provide a seamless experience for API consumers to manage their secrets. This approach not only enhances security but also simplifies the overall credential management process.
Thanks for reading!
